The Macros feature in Web2Chat allows support team members to quickly respond to customer inquiries using preset messages, saving time and improving response consistency.
With macros, users can set up pre-written responses and attach actions such as assigning conversations, snoozing, or closing conversations. Additionally, users can personalize macros with emojis, GIFs, and file attachments.
Step-by-Step Guide to Using Macros
To set up a macro, follow these steps:
- From the Web2Chat dashboard, go to Settings--> MyWorkspace Data--> Macros.
- Click on the +New Macro button located in the Macros section.

- A popup window will appear for you to create your macro. In the popup, fill in the following fields:
- Title: Enter a unique, descriptive name for your macro. This will help you easily identify it later.
- Response Message: Type the message you want to send to customers. This message will be displayed whenever the macro is used in a conversation.

- You can specify actions to be triggered along with the message, including:
- Assign the Conversation: Choose a team member to automatically assign the conversation to after the macro is sent.
- Snooze the Conversation: Temporarily pause the conversation if you need to follow up later.
- Close the Conversation: Automatically close the conversation after the macro response is sent.

- You can also enhance the response with emojis, GIFs, and attachments.
- Add Emojis for a friendly tone.
- Include GIFs for an engaging response.
- Attach files or images to provide additional information to the customer.
- Click Save to finalize and store your new macro.
Your macro is now ready for use in conversations with customers.
Using a Macro in a Customer Conversation
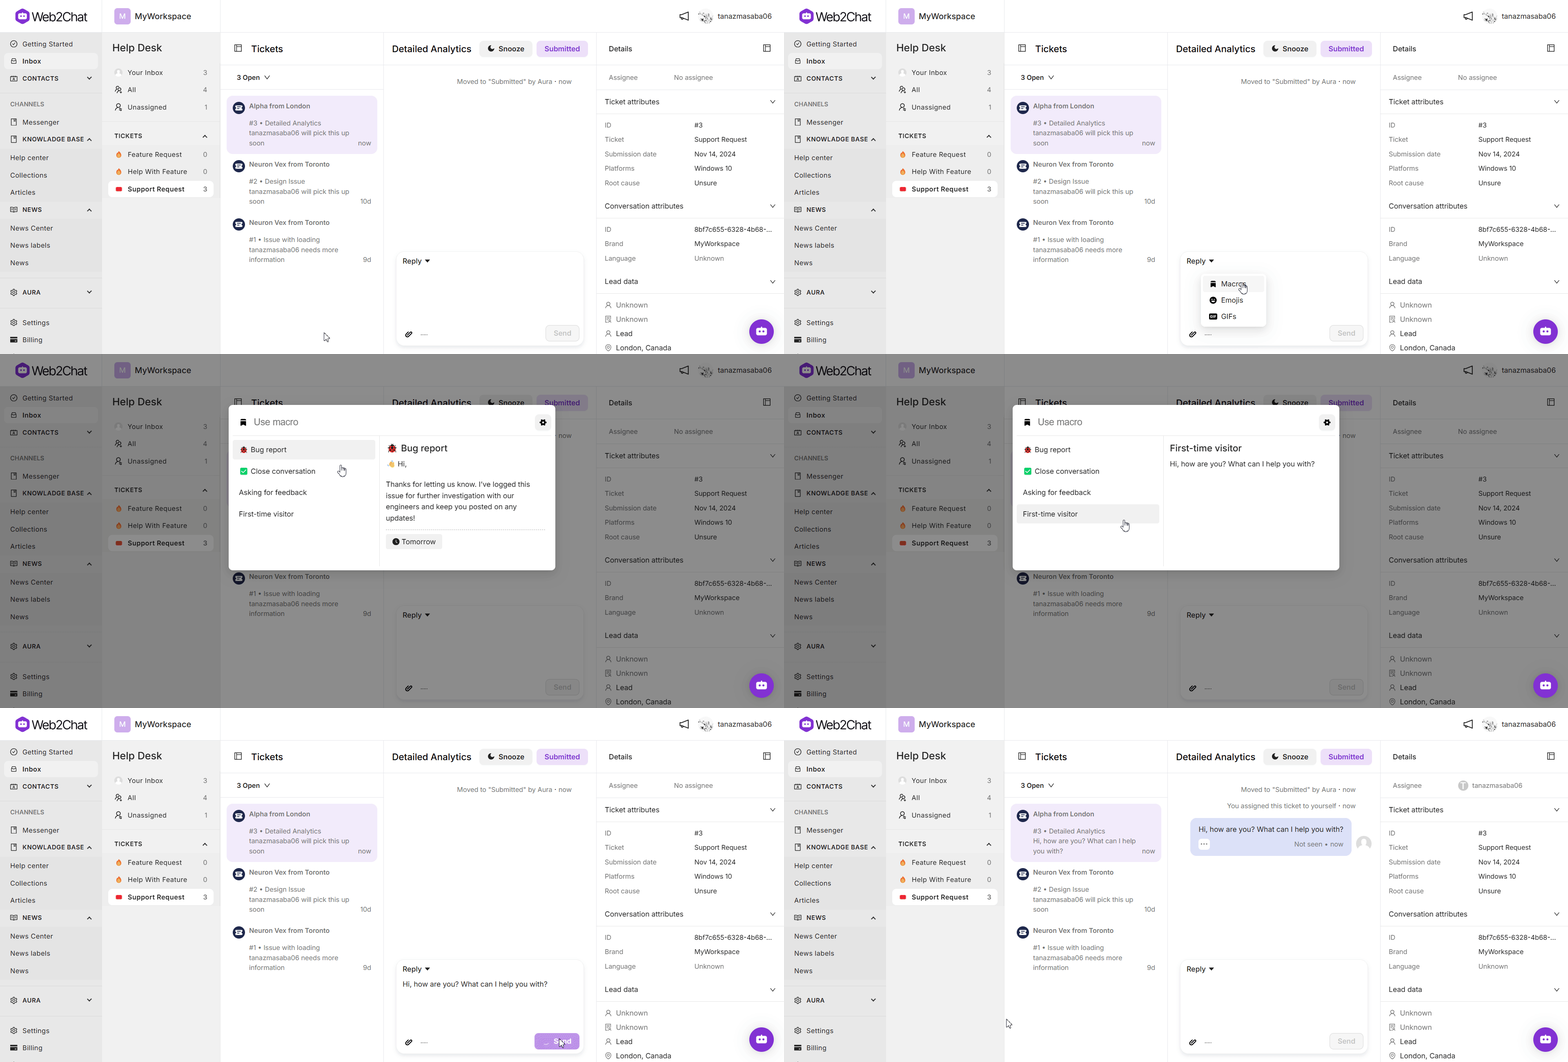
Once you have created a macro, you can quickly apply it in your ongoing customer conversations:
- Go to your Inbox from the Web2Chat dashboard.
- Select the conversation you want to respond to.
- Within the conversation view, locate and click the three-dot icon in the top right corner of the conversation panel.
- From the dropdown menu, select Macros.
- A list of your saved macros will appear. Click on the macro you wish to use.
- The macro’s pre-written response, along with any assigned actions and enhancements, will automatically be applied to the conversation.

This allows you to quickly send a well-crafted response and perform relevant actions with minimal effort.
Combining Multiple Macros
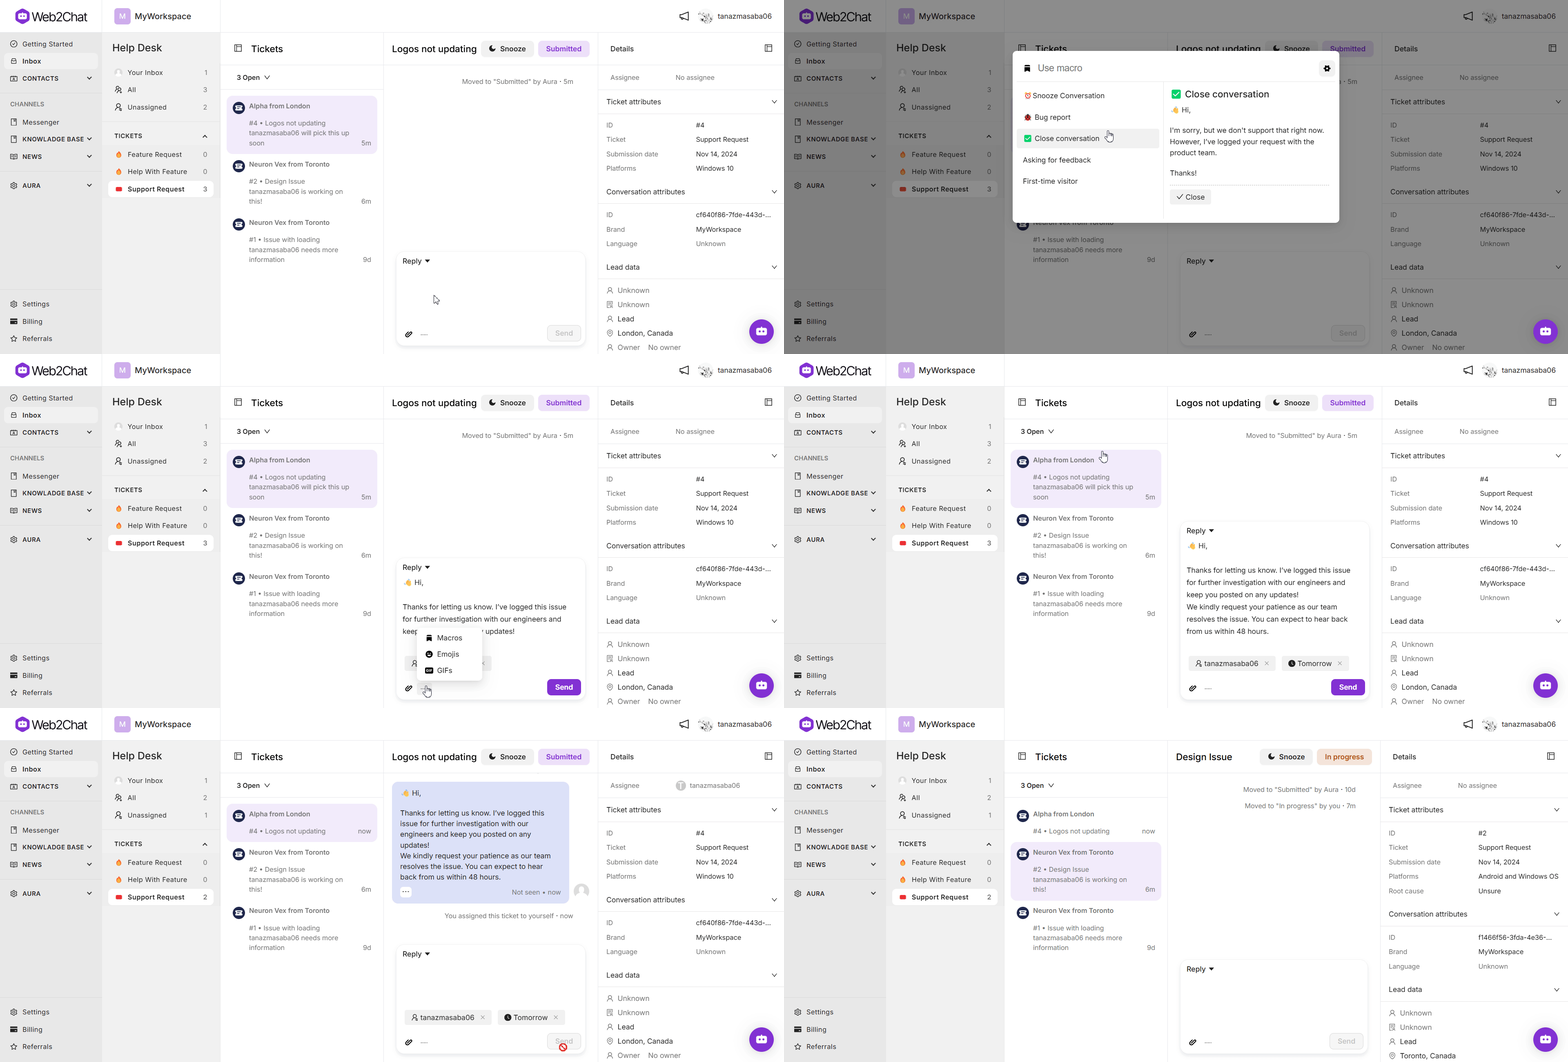
For specific or complex customer interactions, you can apply multiple macros within a single conversation to address different needs:
- In your Inbox, open the relevant conversation with the customer.
- Click the three-dot icon and select Macros to open your list of saved macros.
- Choose the first macro you’d like to apply (e.g., a macro that assigns the conversation to the Sales team).
- Reopen the Macros menu and select an additional macro to add further context or actions (e.g., a macro that informs the customer of a delay and snoozes the conversation until Monday).
- Both macros will be applied, combining their responses, actions, and enhancements. This allows you to handle specific scenarios efficiently and adapt responses to the needs of the conversation.
Combining multiple macros can be helpful for unique situations, ensuring your response is both accurate and complete.

Resolving Conflicts with Multiple Macros
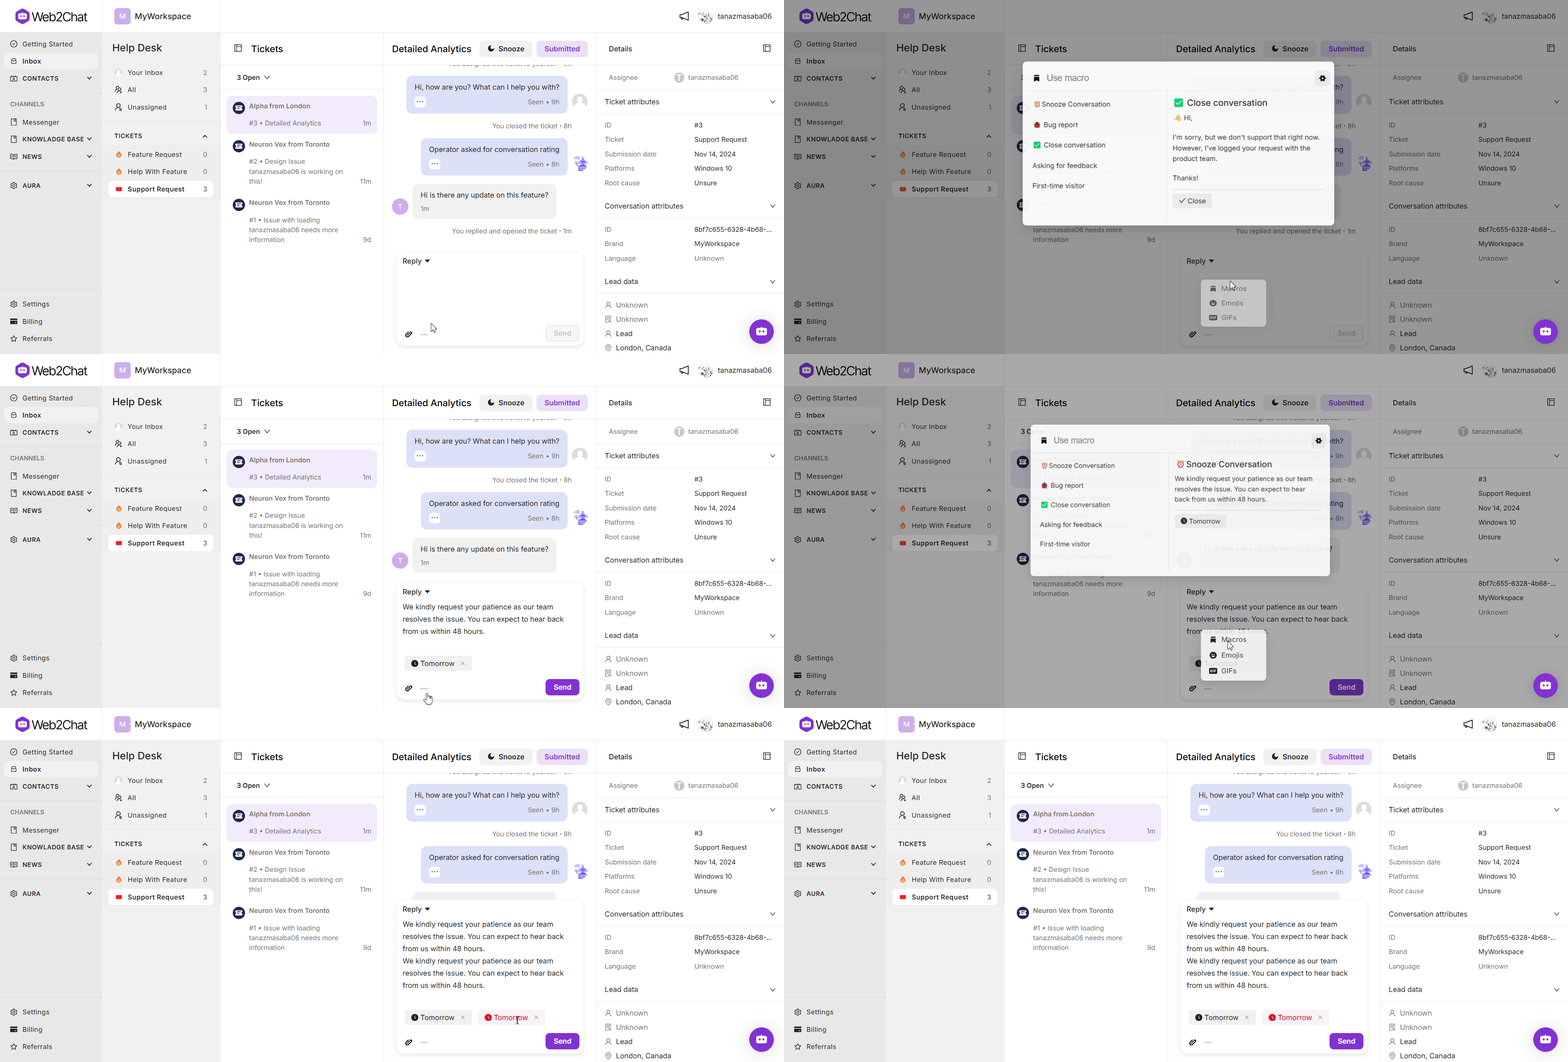
When applying multiple macros with conflicting actions (e.g., if each macro assigns the conversation to a different team), Web2Chat provides an easy way to resolve these conflicts.
- Identify Conflicting Actions: When you apply multiple macros with actions that conflict, Web2Chat will highlight these conflicts for clarity. For example, if one macro assigns the conversation to the Sales team while another assigns it to Support, Web2Chat will flag this conflict.
- Understand Overriding Actions: By default, the most recent action applied will override previous actions of the same type. For example, if you first assign a conversation to Sales and then apply another macro that assigns it to Support, the final assignment will be to Support.
- Resolve or Remove Unwanted Actions: To manually resolve a conflict, click on the highlighted action to remove or adjust it as needed. This allows you to ensure that only the appropriate actions are applied to the conversation.

Editing Or Deleting a Macro
If you need to update an existing macro:
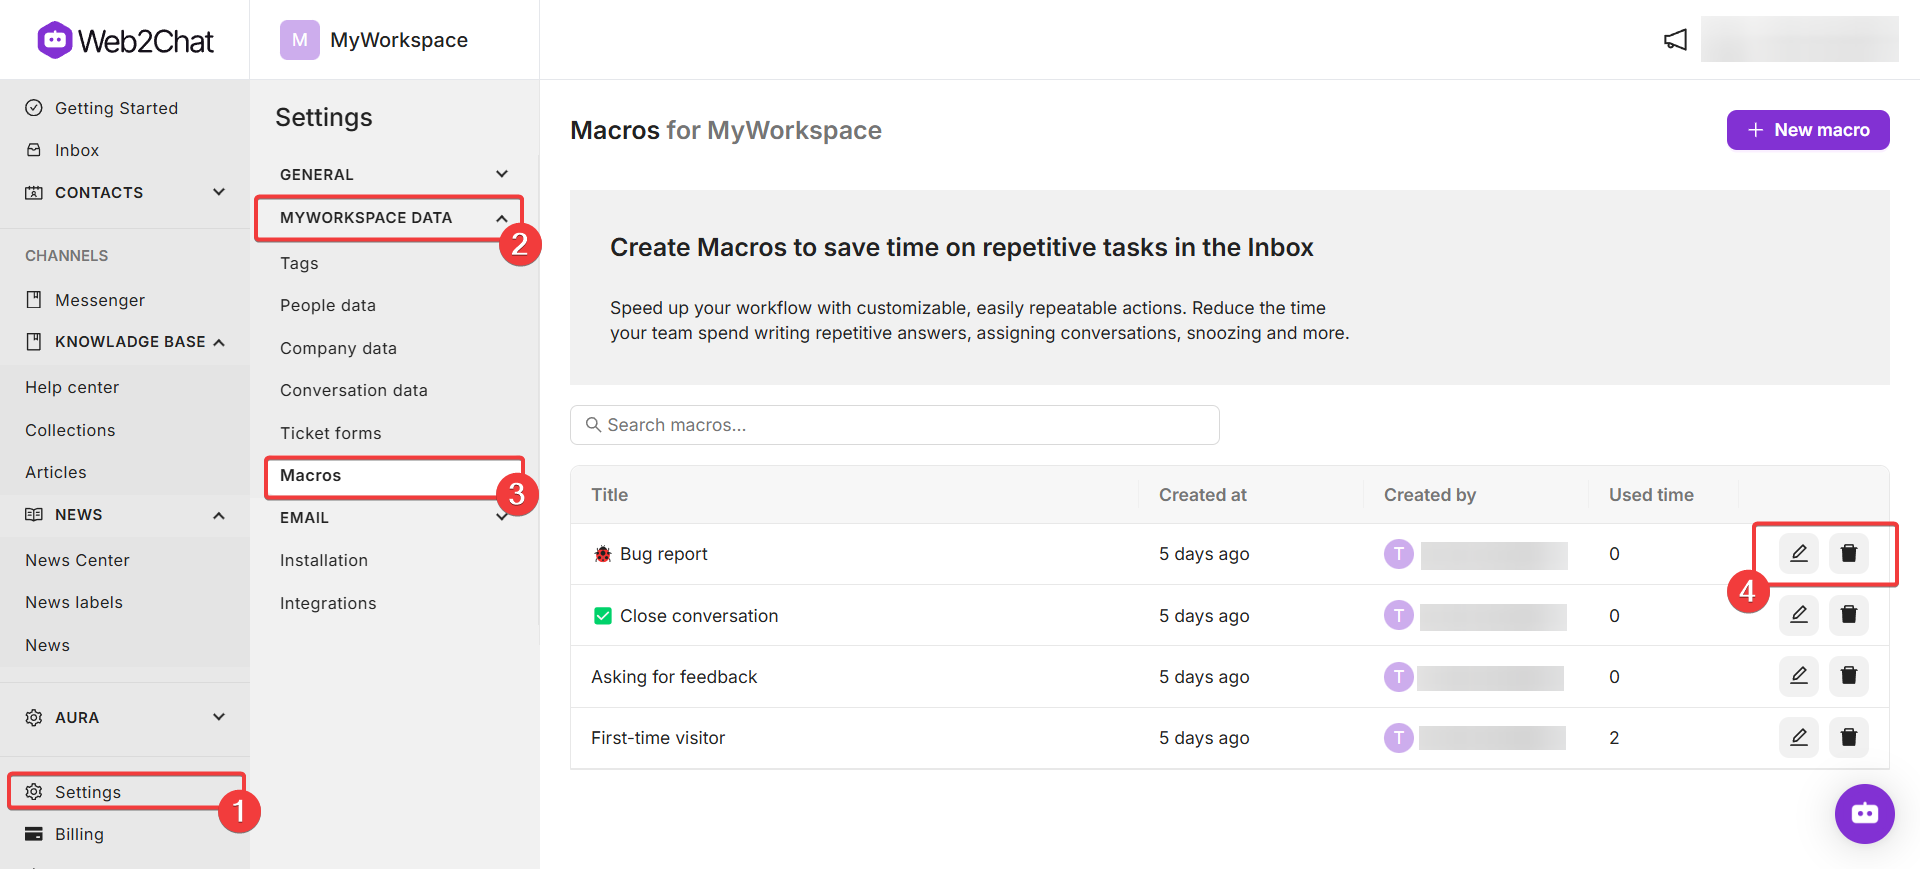
- From the Web2Chat dashboard, go to Settings.
- Select MyWorkspace Data and then click on Macros.
- In the Macros list, find the macro you want to edit or delete.
- To edit the macro: Click on the Edit icon next to the macro. Modify the macro’s name, response message, actions, or enhancements as needed.
- To delete the macro: Click on the Delete icon next to the macro. Confirm the deletion when prompted.

The Macros feature in Web2Chat simplifies support interactions by providing quick, pre-set responses and customizable actions, enhancing both the speed and quality of customer support.
With the flexibility to edit, delete, and customize macros with actions, emojis, GIFs, and attachments, Web2Chat’s Macros ensure that team members can respond quickly and consistently across a range of customer queries.
If you need further assistance, contact our Customer Support.
