
Web2Chat allows you to manage and authenticate a custom email domain to ensure that your support emails are sent securely from your own domain. Follow these steps to add and authenticate your custom domain.
Note: Adding a custom email domain is an exclusive feature only available with the Remove Branding addon.
How to Manage and Authenticate a Custom Email Domain
- From your Web2Chat dashboard, go to Settings > Email > Domains.
- Click on the Add and Verify Domain button to add your custom email domain.
- You will receive an email with a link to allow permission for this email domain to be used as shown below. Click on the button and return to Web2Chat dashboard.
 Note: Only work emails are supported. Any email address ending in
@gmail.com,@hotmail.com, or@outlook.comis not supported at this time.
Authenticate Your Domain
After adding your domain, you'll need to update the CNAME records from your domain provider.
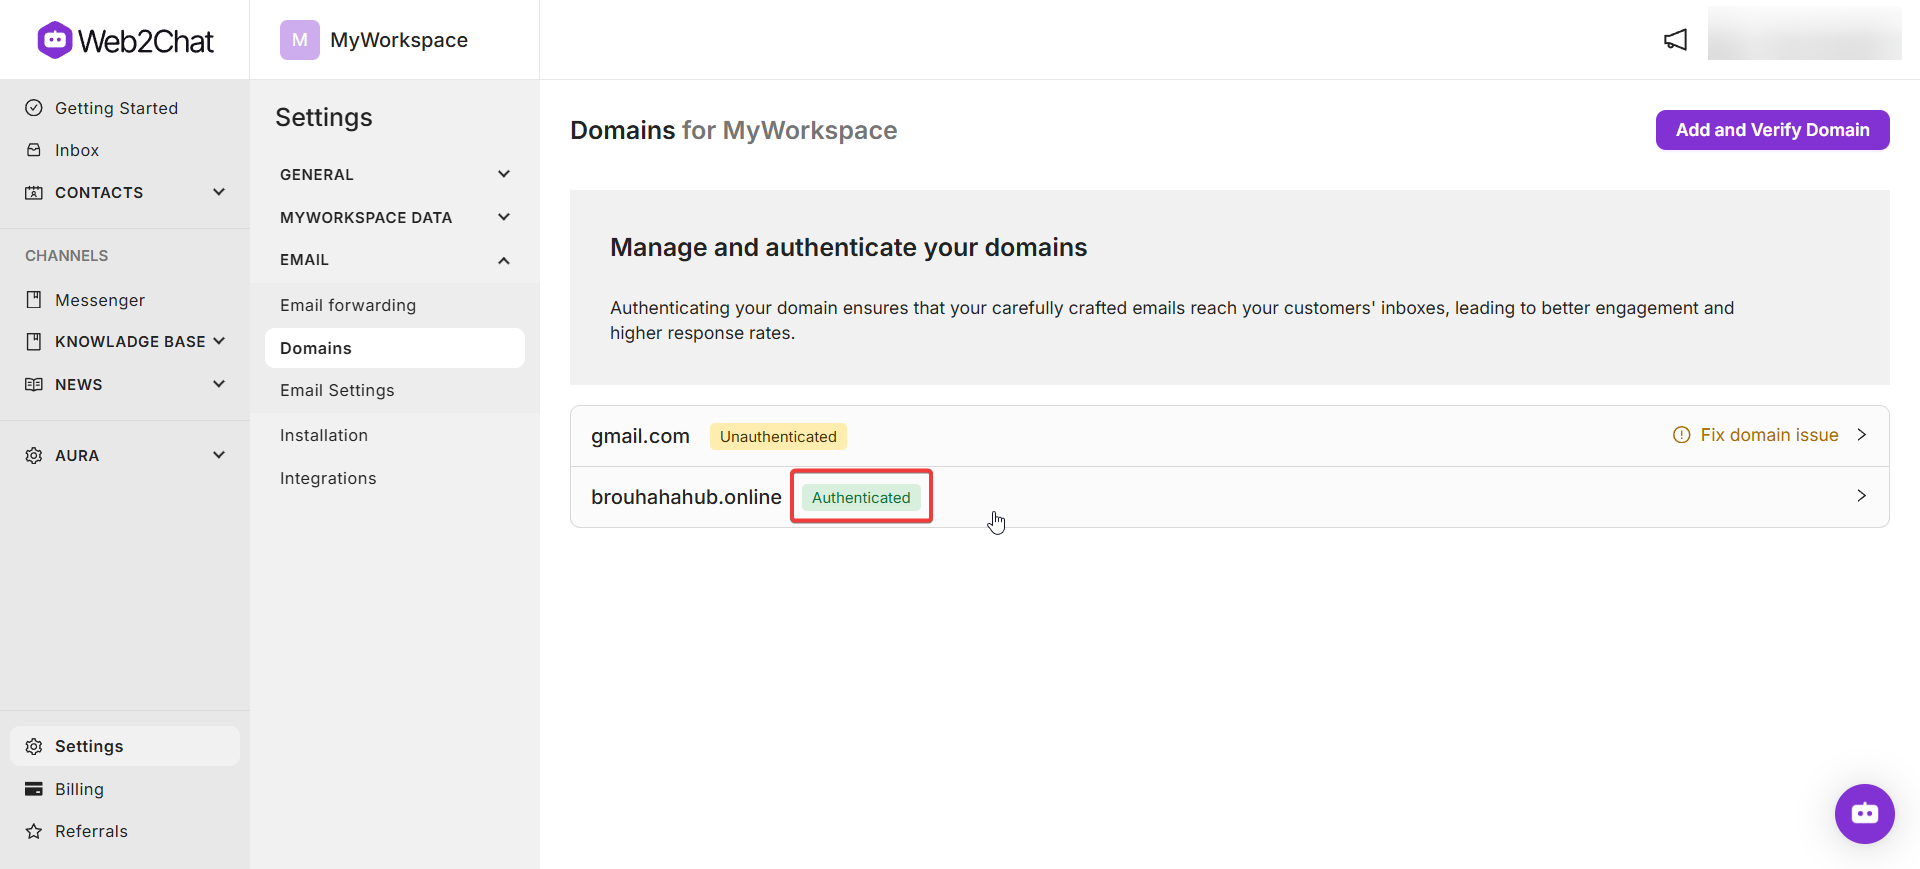
- From your Web2Chat dashboard go to Settings--> Email--> Domain.
- Click on 'Fix domain issue' next to the domain you want to authenticate.
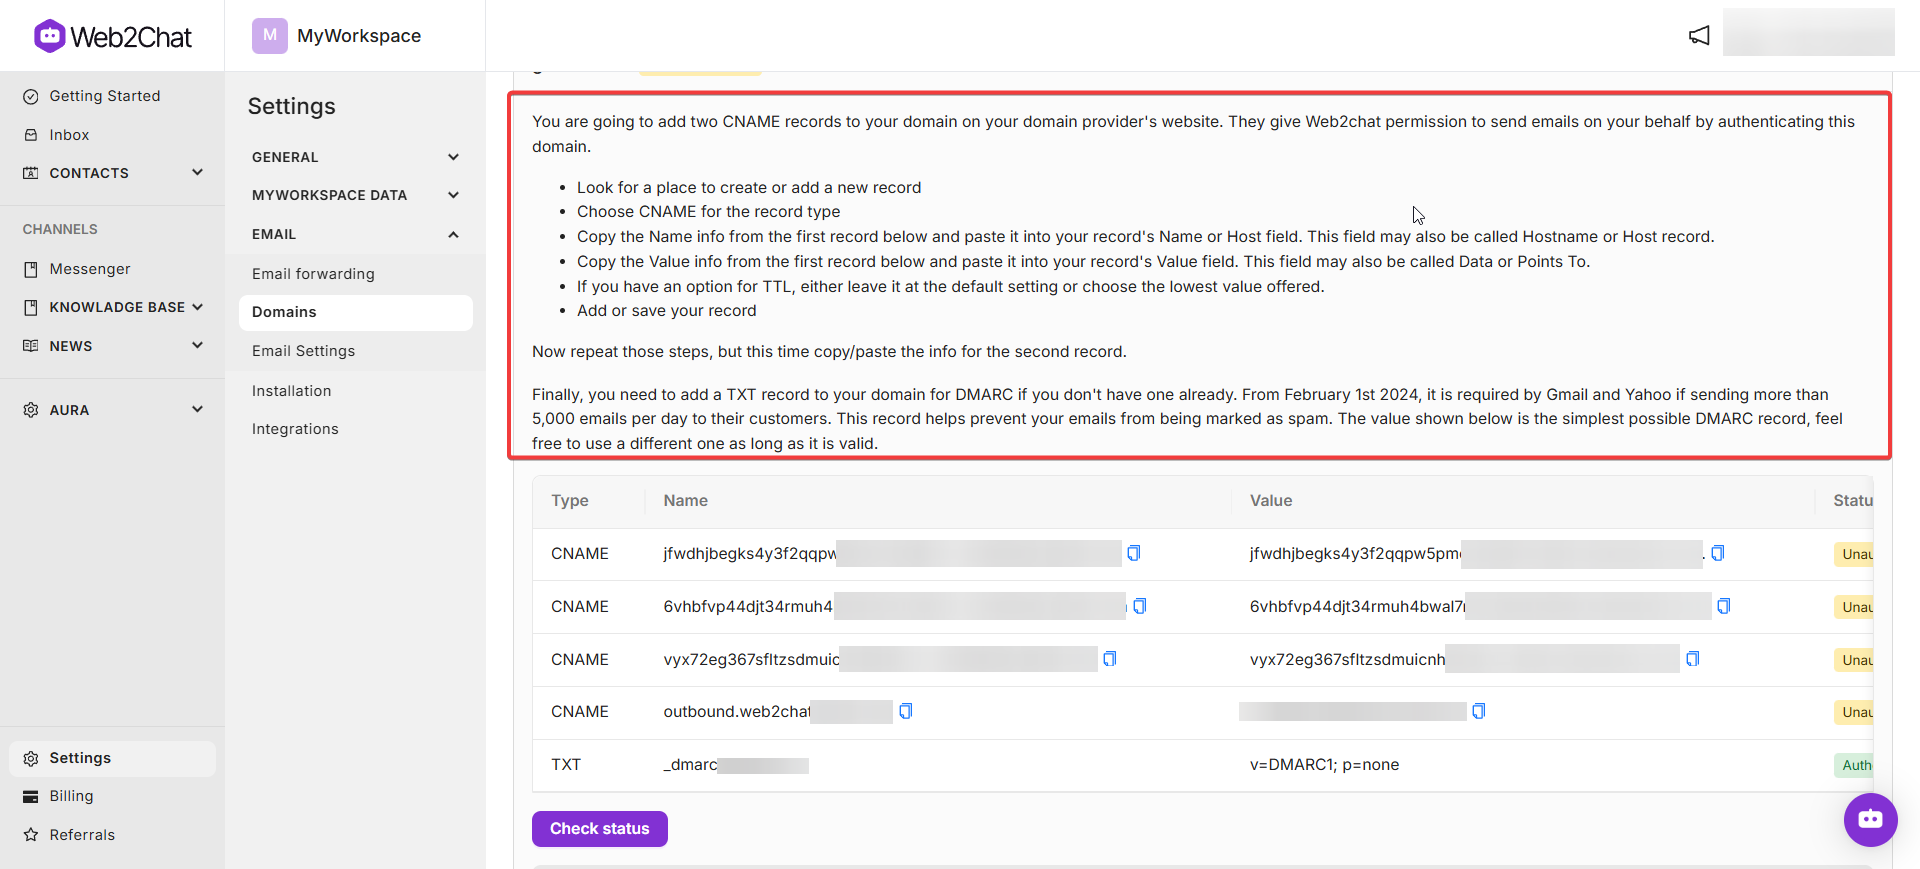
- You will now see the step-by-step instructions to update the CNAME records from your domain provider and authenticate your domain.
Note: The steps shown in the dashboard may vary depending on the provider you're using. Continue reading below to see detailed instructions for different providers.
Authenticating Your Domain via Cloudflare
- Log into your Cloudflare account and select the domain you want to authenticate by selecting its Name from the domains table.
- Next, on the left-hand sidebar, navigate to DNS--> Records and then click on the Add record button.
- Change the Type field to CNAME.
- Copy the CNAME "Name" from the first Name info on Web2Chat and paste it into the Name field in Cloudflare. Then copy the first CNAME "Value" from Web2Chat and paste it into the Target field in Cloudflare.
- Disable Proxy status and set the TTL to "Auto".
- Save the changes in Cloudflare.
- Repeat Steps 2 to 6 for all the CNAME records.
- Now, add a TXT record to your domain for DMARC if you don't have one already. For this, click on Add record in Cloudfare but this time, set the Type as TXT.
- Copy the TXT "Name" from Web2Chat and paste it into the Name field in Cloudflare. Copy the TXT "Value" from Web2Chat and paste it into the Content field in Cloudflare.
- Save your changes
- Return to Web2Chat and click Check Status to complete the authentication.
Note: It may time some time for the authentication to complete. Wait a few minutes and try again if it doesn't happen the first time instantly.
Authenticating Your Domain via Squarespace
- Log into your Squarespace account and go to Settings > Domains.
- Select your domain and go to Advanced Settings > DNS Settings.
- Scroll down to the "Custom records" section at the bottom of the page and select Add record and choose the type CNAME.
- Add a new CNAME record with the following details:
- Host:
your_domain_namefrom Web2Chat - Alias data: The provided value from Web2Chat
- Save the changes in Squarespace.
- Repeat this process for all the CNAME records.
- Once you've finished adding the CNAME records, add the TXT record by selecting Add record and choose the type TXT.
- Copy the TXT "Name" from Web2Chat and paste it into the Host field in Squarespace. Then copy the TXT "Value" from Web2Chat and paste it into the Text data field in Squarespace. Save the record.
- Return to Web2Chat and click Check Status to complete the authentication.
Authenticating Your Domain via GoDaddy
- Log into your GoDaddy account and go to the DNS Management page for your domain.
- Scroll down to the "Custom records" section at the bottom of the page and select Add record and choose the type CNAME.
- Add a new CNAME record with the following details:
- Name:
your_domain_name - Value: The provided value from Web2Chat
- Set the TTL to ½ hour
- Save the changes in GoDaddy.
- Repeat this process for all the CNAME records.
- Once you've finished adding the CNAME records, add the TXT record by selecting Add new record and choose the type TXT.
- Copy the TXT "Name" from Web2Chat and paste it into the Name field in GoDaddy. Then copy the TXT "Value" from Web2Chat and paste it into the Value field in GoDaddy. Save the record.
- Return to Web2Chat and click Check Status to complete the authentication.
Authenticating Your Domain via Namecheap
- Log into your Namecheap account and go to Domain List.
- Select your domain and click on Manage.
- Go to the Advanced DNS tab and add a new CNAME record with the following details:
- Host:
your_domain_name - Target: The provided value from Web2Chat
- Set the TTL to "Automatic"
- Save the changes in Namecheap.
- Repeat this process for all the CNAME records.
- Once you've finished adding the CNAME records, add the TXT record by selecting Add New Record and choose the type TXT.
- Copy the TXT "Name" from Intercom and paste it into the Name field in Namecheap. Then copy the TXT "Value" from Intercom and paste it into the Value field in Namecheap.
- Set the TTL to "Automatic" and Save the record.
- Return to Web2Chat and click Check Status to complete the authentication.
When you have successfully authenticated your custom domain, the status should update indicating that your domain is now ready to be used.
If you need further assistance, contact our Customer Support.